⏱ around 5 minutes read time
Tagged with:Implement custom URL scheme in iOS
Custom URL schemes is a great way to enable automation in your application for power users or to allowing users or other developers to go to a view or a state in your app by using a URL just like browsing the web.
This blog post will help you create a application with a label that displays whatever URL it was open with. Using URLs can be very powerful and you could basically automate any tasks using them. But keep in mind to be responsible and validate the URLs later on, especially if your users has important data in the application and you allowing them to delete everything using an URL. Maybe you don't want that to happened just because the user clicked a link on the web.
You could for example in the same application, or from another one open this application with this code.
UIApplication.shared
  .open(URL(string: "urlviewer://HelloWorld")!,
        options: [:],
        completionHandler: nil)
You can use this feature also to link to places inside your own application
Create the application
Launch Xcode and create a new Xcode project. Select "iOS" and "Single View App". Name the project whatever you like. I will name my application "URLViewer". We will not use tests or core data right know so leave them unchecked. Make sure you select the language "Swift".
Create a view where we can view that it works
Open "Main.storyboard" and place a label into the middle of the screen. Add constraints around the label so it is 8 points from left, right, top and bottom of the safe area.
Select "Character Wrap" in the "Line Break" option to make sure that the URL will be fully displayed even if it's a long one.
Open the "ViewController.swift" file in the assistant editor by holding down option key while you click on the file in the file tree.
Select the label, then click and hold on the label while dragging the mouse cursor to the view controller. Drag the cursor to an empty place inside the view controller class and drop it where it fits, you will get an blue horizontal line where you can drop it. Name the outlet urlLabel. It should create a row that looks like this.
@IBOutlet weak var urlLabel: UILabel!
You should now be able to start the application and see that you have a simple label in the middle of the screen.
Register the URL scheme
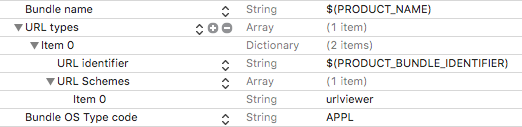
Open the file "Info.plist" and add a new entry called "URL types". To add a new entry you can select any existing one, for example "Bundle name" and press the enter/return-key on your keyboard.
Expand "URL types" and the first child element, you will now see a element with the key "URL identifier". This should be the same identifier as your application. So it is easiest to enter $(PRODUCT_BUNDLE_IDENTIFIER) and it will use whatever bundle identifier you already setup.
Now you should add a new key just under the "URL identifier". Call it "URL Schemes". It will be an array of strings and we open that one and add our URL scheme as the first item. I will call it urlviewer.
When the app is launched iOS will now register that url scheme for the application. Note that it should be kind of unique, but their is now validation of that in iOS or from Apple. So anyone could basically create an application with the same scheme and you and the user will not be the one that decides which app it will open in. So don't include to much secrets into the URLs.
You can test that the application responds to the url scheme already by running the application, go to home and open safari on the device. Now you enter and submit urlviewer:// in the adress field and it will ask you to open the application.
When we open the application with the URL it will do nothing. So in next step, lets add whatever URL the user typed with that scheme to our url label that we created earlier.
Read the URL the user launched the app with
To read the URL you need to implement the method application(_:open:options) in the AppDelegate. Write it like below.
func application(_ app: UIApplication,
                 open url: URL,
                 options: [UIApplicationOpenURLOptionsKey : Any] = [:]) -> Bool {
    return true
}
This method will be called when the application is launched with a URL. The URL will be accessible for us in the variable url. So lets take that and add it to our label.
We can access the root view controller through the window. We only have one controller in the project we can also be sure that it's the ViewController.
func application(_ app: UIApplication,
                 open url: URL,
                 options: [UIApplicationOpenURLOptionsKey : Any] = [:]) -> Bool {
    let vc = window?.rootViewController as! ViewController
    return true
}
Now when we have access to the view controller we can set the label text to the same as the url.
func application(_ app: UIApplication,
                 open url: URL,
                 options: [UIApplicationOpenURLOptionsKey : Any] = [:]) -> Bool {
    let vc = window?.rootViewController as! ViewController
    vc.urlLabel.text = url.absoluteString
    return true
}
Run the application again. First you will only see the text "Label" as before. But if you go to Safari and enter urlviewer://foobar it will show that instead, and urlviewer://example will change it to that value.
Hope you did well following along. Please comment and tell me what you are planning to use custom url schemes for.